Deploy Openshift on Amazon EC2 or your private cloud
26/02/2013 - Laurent Eschenauer (@eschnou)
In this blog post, we explain how to deploy and scale an Openshift Origin cluster, using ComodIT’s orchestration possibilities. This is the fourth post in our Cloud Orchestration serie.
We successfully tested the deployment of Openshift on Amazon EC2, Eucalyptus and Openstack, however it should be possible to use any platform supported by ComodIT (Rackspace, Cloudstack, etc.) or even deploy the cluster on a bare-metal infrastructure.
These orchestration scripts are available in the ComodIT repository. These scripts target a Fedora 18 distribution.
5 minutes screencast summary
If you don’t feel like going through this tutorial yourself but just want to get a feeling of how it works, here is a five minutes screencast for you.
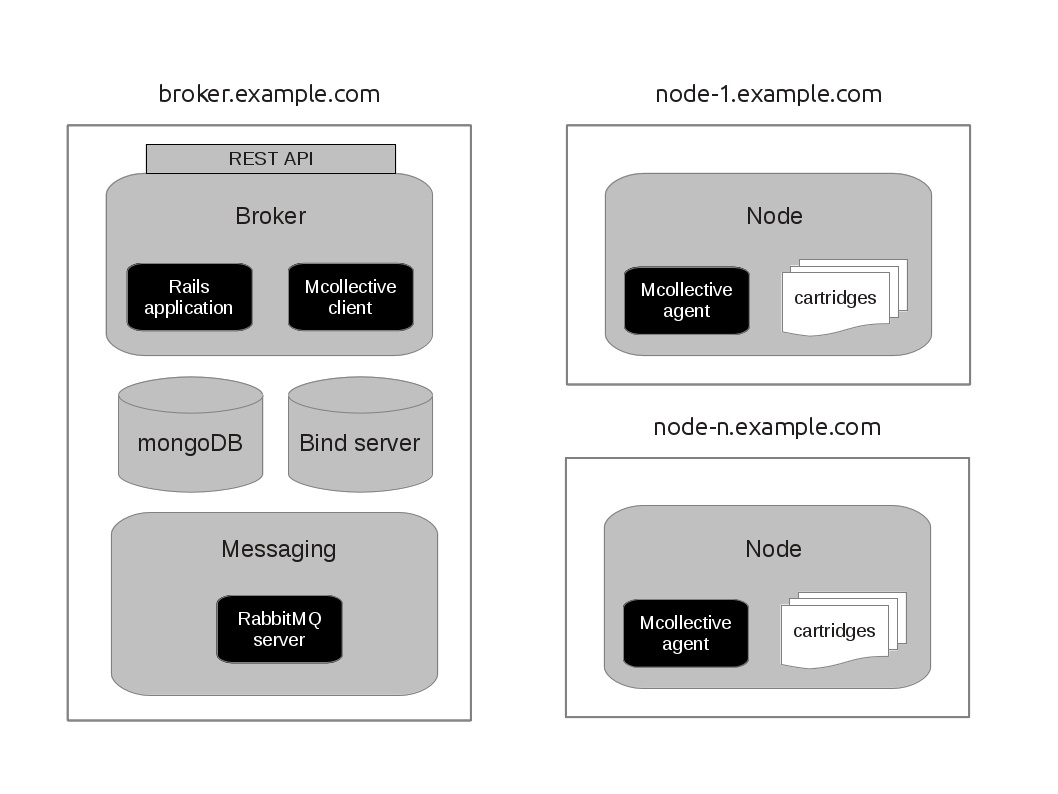
Deployment topology
The following diagram shows you the deployment topology we selected for these recipes. It closely matches the one described in this tutorial. In summary, we have a broker server which manages everything and holds all the storage, dns, messaging components. We then have one or more nodes which are responsible for hosting and executing the end-user applications.
Deploying a high-availability cluster would require to decouple the various components of the broker. This can easily be done while re-using most of the recipes from this orchestration scenario.
Requirements
A ComodIT account (you can register for free here).
A ComodIT platform.
If you haven't done it yet, add your cloud platform to ComodIT. In the ‘Platform’ section, click the Add button, pick a driver and fill in the specific details. For more information, you can follow one of these tutorials.
Note that you won’t be able to deploy this example on the ‘Demo Platform’ provided by default, which is limited to maximum one provisioning at a time per user.A ComodIT distribution.
The application templates used in this orchestration scripts have been written for Fedora 18. You should therefore deploy on a compatible distribution. If you deploy on EC2, the easier is to get the ‘Fedora 18 (AMI)’ image from the ComodIT marketplace.
The ComodIT Python library (bundled with the command-line interface, see this tutorial for information about how to install it).
Setup an Openshift security group
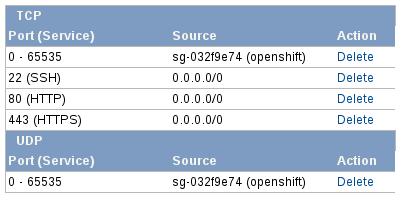
Whatever the cloud platform you are using, there is probably a security group mechanism to isolate your instances from the external world, and between each others. Since Openshift requires your nodes and your broker to communicate over some ports, you’ll have to create a security group for them.
The simplest group is to authorize all communications between hosts of the group, and open ports 22,80,443 to the external world. If you are using Amazon EC2, your security group will look like this:
Deployment
Clone the demos public repository and enter Openshift’s folder:
 git clone git@github.com:comodit/demos.git
 cd demos/openshift
Create a
config.pyfile with the following content:# ComodIT Account details endpoint = "https://my.comodit.com/api" username = "<user>" password = "<password>" organization = "<org_name>" # Your openshift domain. You will have to delegate the DNS of this zone # to the broker domain = "example.com" # Openshift Origin repository to use # By default, the latest tested snapshot is used, you can override it here. # Changing this requires to run a cleanup/setup. # # repo = "https://mirror.openshift.com/pub/openshift-origin/nightly/fedora-18/latest/x86_64/" # Openshift cartridges to deploy on the node # Changing this requires to run a cleanup/setup # cartridges = [ "openshift-origin-cartridge-php-5.4", "openshift-origin-cartridge-ruby-1.9", "openshift-origin-cartridge-mysql-5.1" ] # API Timeout time_out = 60 * 30 # seconds # Target platform. Make sure your security group has all # required ports open platform = {"name" : "Amazon EC2", "settings" : { "ec2.instanceType": "m1.large", "ec2.securityGroups": "openshift", "ec2.keyPair": "eschnou" } } # Target distribution (must be Fedora 18 for this recipe) distribution = {"name" : "Fedora 18 (AMI)", "settings" : {}}where
<user>and<password>are your ComodIT credentials,<org_name>the name of your organization. You should replace/update the ‘Amazon EC2’ platform with the one you intend to use, and update/replace the distribution if you aren’t using the Fedora 18 distribution provided by ComodIT.Warning: The applications you will deploy in next step are only compatible with Fedora 18! Therefore choose your ComodIT distribution accordingly. A distribution from the store like ‘Fedora 18 (AMI)'can be used.Warning: Openshift won’t work on ‘micro’ instances on EC2. You’d better use a larger instance if you don’t want to get into memory usage troubles.Setup you ComodIT account (i.e. create all required applications and create an environment that will contain the cluster’s hosts) :
./setup.pyDeploy the broker: the following script will deploy and configure a broker. It creates a first user with username
openshiftand passwordsecret. You can of course easily change the recipes to modify these default settings../deploy-broker.pyOnce the broker is deployed, the script returns the public hostname where it can be reached.
Deploy a node: when you have your broker online, you can add your first node by executing this script.
./add-node.pyYou can execute it as many times as you wish to add additional nodes to your cluster. It would be quite easy to make this script a bit more elaborate, for example reacting to some events to automatically scale your cluster.
Deploy a client (optional): if you don’t want to install the Openshift client tools on your local host, you can deploy a client host using the following script:
./deploy-client.py
Using your Openshift Cluster
If you are using the remote client, ssh into the machine. We are using the Amazon convention and the
user is named ec2-user.
ssh <client-hostname> -l ec2-user -i <path-to-key>
The first thing to do is to export in a variable the hostname of the broker:
export LIBRA_SERVER=broker.example.com
Now you can launch the setup command, using the Openshift account (user openshift, password secret) that was previously created:
rhc setup
You are now ready to go! Create your first app, push and enjoy your new PaaS.
Shutting down cluster
You can delete all hosts created during deployment and scaling operations:
./teardown.py
If you also want to clean-up your organization (i.e. delete the applications and environment created by setup script):
./cleanup.py
Other posts in this serie
- A single API to manage your entire infrastructure
- Effortless deployment and scaling of a Ceph cluster
- Deploy and scale a Blender 3D rendering farm in the cloud
blog comments powered by Disqus
Recent Posts
-
Three Cool Use Cases for Docker within ComodIT
10 Sep 2013 by Laurent Eschenauer
-
Install server applications in one click directly from the web
15 May 2013 by Laurent Eschenauer
-
Introducing Combox: a simple tool to deploy virtualized development environments
18 Apr 2013 by Laurent Eschenauer