Provisioning on Microsoft Azure
The following is a step-by-step tutorial to get you started with ComodIT and provision your first host on Microsoft Azure. If you get into troubles while following this guide, have a look at our support section for help.
1. Pre-requisites
a. You have a ComodIT account
We assume that you already have created an account on ComodIT and verified your email by clicking the link we sent you. If you have issues subscribing to our service, please contact support.
b. You have a Microsoft Azure account
We also assume that you have a Microsoft Azure account you access via https://portal.azure.com. At this stage, you can already take note of some parameters that will be needed later:
- The subscription ID
- In Azure dashboard’s main menu, select “Billing” (you might have to click on “More services”) and, in “My subscriptions” panel, locate the subscription you want to use and copy related subscription ID.
- The tenant ID
- In Azure dashboard’s main menu, select “Azure Active Directory” (you might have to click on “More services”) and, in the sub-menu, select “Properties”. The value named “Directory ID” is your tenant ID
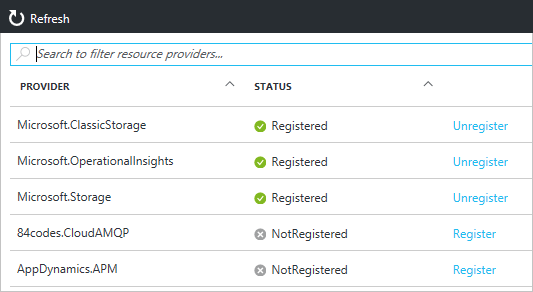
c. Registered resources provider
When create subscription (free or paid) make sure every needed “resources provider” are registered within your subsciption. (A Resource Provider (RP, for short) is simply an HTTPS RESTful API contract that Add-on owners will implement so a trusted Azure endpoint can provision, delete, and manage services on a user’s behalf.).
You can see the registration status and register a resource provider namespace through the portal.
Select “All services” and click on Subscriptions.
For your subscription, select Resource providers.

Look at the list of resource providers, and if necessary, select the Register link to register the resource provider of the type you are trying to deploy (ad minima : Microsoft.Network, Microsoft.Storage,Microsoft.Compute).
d. You have a Resource Group defined in your Azure account
In order to define a clear scope for the resources managed by ComodIT, you should define a Resource Group ComodIT will manage.
In Azure dashboard’s main menu, select “Resource Groups” (you might have to click on “More services”). If none is listed, please create one. Take note of the Resource Group’s name and location, you will need them later. Also, all resources created below should be located in the same location as the Resource Group.
e. You have an Application with proper access to above Resource Group
In order to grant a secure access to your Resource Group, you’ll need to define an Application and its associated key.
- In Azure dashboard’s main menu, select “Azure Active Directory” (you might have to click on “More services”) and, in the sub-menu, select “App registrations”.
- Click on “New application registration” to define a ComodIT Application.
- Enter name “ComodIT” (or whatever name that suits you the best),
- select Application type “Web app / API” and
- enter “https://my.comodit.com” as sign-on URL.
- Once the application has been created, select it:
- In the details, copy the application ID for later.
- In the settings, go to “Keys” section
- Enter a description and an expiration date
- Save the key and take note of the generated token, this is the application key.
- Grant the application access to above Resource Group:
- Select the Resource Group,
- in the “Access Control (IAM)” section, add ComodIT Application as a Contributor.
e. You have a Virtual Network and at least one Subnet defined
To define the network the virtual machines created by ComodIT will be attached to, a virtual network and a subnet should be created.
- In Azure dashboard’s main menu, select “Virtual Networks”,
- If none is already defined and attached to your Resource Group, create one and attach it to the Resource Group. We recommend the address space 10.0.0.0/16 for the virtual network and 10.0.1.0/24 for the sub-net. Copy the subnet name for later, it will used to configure your host.
f. You have a Network Security Group defined
To secure the remote access to the virtual machines created by ComodIT, a Network Security Group (NSG) should be defined.
- In Azure dashboard’s main menu, select “Network Security Groups” (you might have to click on “More services”),
- If no NSG is available in your Resource Group, create one and attach it to existing Resource Group.
- Review your inbound and outbound security rules. You might for instance only allow (i.e. add) SSH and HTTP in-bound traffic.
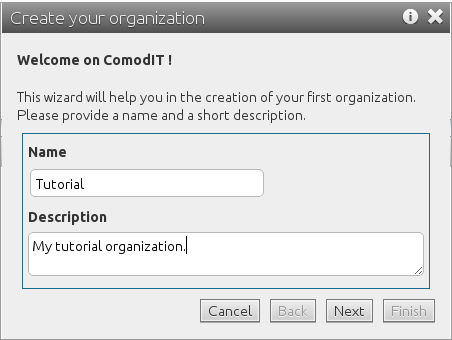
2. Log-in to ComodIT
If you log-in for the first time in ComodIT, a dialog pops up and invites you to create your first organization. It will keep on re-appearing as long as you don’t have at least one organization in your account (either you have created it, or someone adds you to an existing organization).
2.1. Create your first organization
If you don’t yet have one, you first have to create a new organization. This organization will act as a container for your ComodIT resources. The organization can be shared between multiple users. Pick a name (has to be unique within the whole of ComodIT) and enter a short description (this is not required). When your new organization is created, it will also be populated with a sample distribution and application so that you can quickly start provisioning your first host.
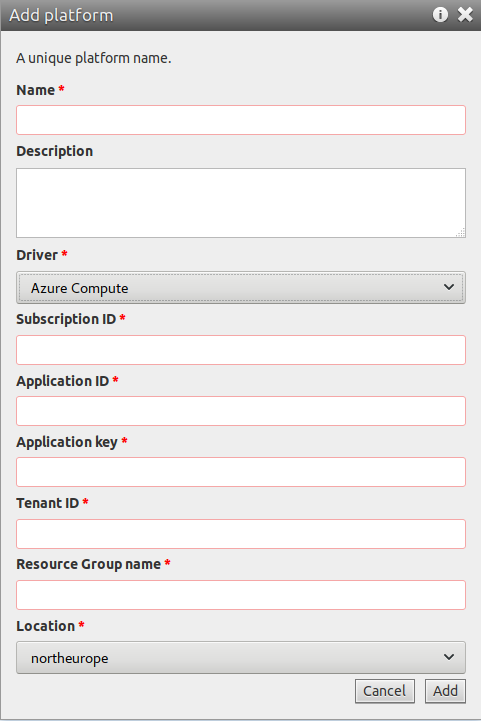
3. Create your Azure platform
Now that you have an organization, you can add an Azure platform to it. A platform describes a target (physical, virtual or cloud) where hosts can be deployed by ComodIT. To add a new one to your organization, go within the ‘Platforms’ section and click the Add button.
Pick a name and enter a description for this new platform. Then select the ‘Azure Compute’ driver in the drop down list and add requested data (see above sections). If you want to work with multiple Resource Groups and locations, you will have to create additional platforms later. When done, click Add.
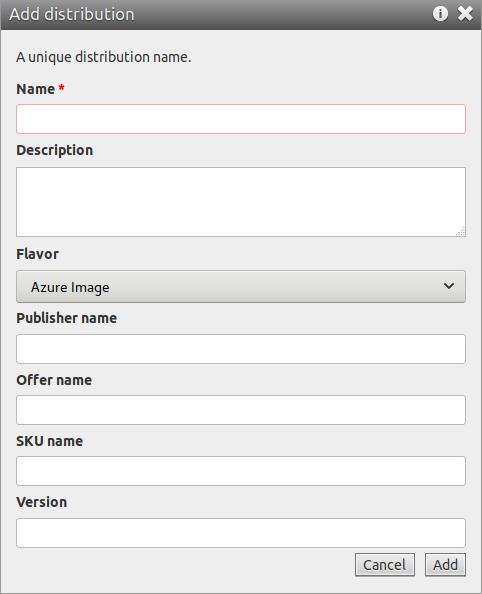
4. Create your Azure distribution
The final step before you can create a new host to deploy on Azure is to define the operating system you want to install. To do so, you have to define a new ComodIT distribution. Go to section “Distributions” in ComodIT dashboard and click the ‘Add’ button. Enter a name, a description and select the ‘Azure Image’ flavor.
An Azure image is identified by a publisher, an offer, an SKU and a version. You can obtain a list of images by using Azure’s CLI. You can, for instance, use the official Ubuntu 16.04 image from Canonical Ltd with the following parameters:
- Offer name: UbuntuServer
- Publisher name: Canonical
- SKU name: 16.04-LTS
- version: latest
The newly created distribution allows you to deploy a host in Azure. However, we still need a little bit of additional work to install ComodIT’s agent on it. The following instructions are valid for above image parameters and might need to be adapted for other images.
In the distribution, click on the ‘Files’ tab and add the 2 files below.
agent.conf
[bootstrap]
register = True
host = my.comodit.com
username = ${_org.access_key}
password =  ${_org.secret_key}
uuid= ${_host.uuid}
customData
#cloud-config

locale: en_US.UTF-8

write_files:
  - path: /tmp/comodit.gpg
    content: |
       -----BEGIN PGP PUBLIC KEY BLOCK-----
       Version: GnuPG v1

       mQGiBE9aJ/wRBACBM8yIsrmsfcclNqMsKtBzOjwLPLTPNQG1ldF+51qea1xQ2vl6
       lZfpxjwTR7J0oORXm+seGOUXh/W4EtgpxBaykLWBjFJXwUp4GffPlASjKYxgsrdi
       IBdadbvOTG2na+17SzB0x4kw7x1KxEXs9FH8p7LhALI+kYdBywXpcUqMGwCgmaIk
       C2nrpg3tj94JY2pKpTDMIkED/0kZ/Q3YebBBv5dwCV52RB5f/5rwFxRy6h8HDv07
       8TI6g5+gZLSQPbHbHiYnsLbbNjWpToY7OzpCg2nHoUJjh3Yn/kbKh5ilzcGuzIit
       T3XrDgQh/siten257/d5B69oNOjirE/+BB7PfrlgieMLD/sLkWfgDxI7rwQHwh6o
       wr3QA/4y8qn9Vi1lWoqDOs+rkUmie2Ui9eK8pHrADLeJZfii9v/TCjoIO+HVGWeR
       vduZ8vu2UgaHW5R83pVipipd0UYyReRMt2oUYZxeYlKDf9qRsAQvB9rG+qkEbjwg
       h6RE64ZLtJpPG+Dq/T4tuh4UdKDRKNOvZtGWSGvXlZ8T0poZCbQgQ29tb2RJVCBE
       RVZFTCA8aW5mb0Bjb21vZGl0LmNvbT6IYAQTEQIAIAUCT1on/AIbAwYLCQgHAwIE
       FQIIAwQWAgMBAh4BAheAAAoJECZSN1Ouu0WG7YwAn1XLfE7ZNAWS9UPOU0xOtHha
       yNGyAKCT397M7ZTUoq0PkNLQihEulFl2q7kCDQRPWigHEAgAyrlIa1MS7asC/XK2
       S86YyKCRrrVXhkWnnU3GARKj6vhEqydNobQaNSV77FpPgG0yDRYl9TUhHIl2DDjD
       gT4wpqSUA5HUmgS1VKIpkMCLq1MdrkbelU7UQg7uaGxYYJcxFYDFRpr+HynwnE8o
       xruveJM1TrVFZhBsg63Ft97rdAF4SVXHADVJjFiN/G86GTnQhK+8dMNaSzgB7w+x
       xlyvqRzfZ3wMjxlQirFB6DaQQL7OR2jQx4ZjFxbBAk2GYaSPif56+hGmXxuj3TJV
       GMbNtZ/djorUQNIcUvo0d+qaHo6RA/pSVrgMtvSvzUM9/2xEA3h9qoqc1RzfKUSi
       kdTuowADBgf/bedI1mNKeW9n9qIGPn9j4z4P3GFjdMdWZEIsi4z55OIJbbDPZArE
       fpooWHN2vWbGkbPqAps0lfaPZcNSr85kKxt89Zf0oN69Mmpx81I8JE9xwyHRHa0T
       laKiGZFCP4mpHdFPP8XMebOBXZ7F7sljFdeKsa/5pNfqgviveGaWrazPepyZYePu
       9E5oKW/U647T0qy5pqHM3Dzi/RYPDeOvoOLfx9pPJYlShqXtdUEIxlaIvKi0uBUX
       Cu6+I9Br8hvY2xXRQIoNiWCHxt29bAo54gQVqd1HoWYoyEQX+az9aBAj0R1X+Cga
       hRQaOIMqIolsk4YC/dY6mZmv6kOusVjFoYhJBBgRAgAJBQJPWigHAhsMAAoJECZS
       N1Ouu0WG5f4AoIX03xobl8P7KkDQe7/hFfrFwHCKAJ9MXVzkceQ+Gel3/1wz8Y6n
       jppeAA==
       =oxzA
       -----END PGP PUBLIC KEY BLOCK-----

<#if _applications.packages??>
packages:
<#list _applications.packages as _pack>
 - ${_pack}
</#list>
</#if>

runcmd:
 - add-apt-repository "deb http://dl.dev-comodit.com/pub/ xenial main"
 - apt-key add /tmp/comodit.gpg
 - apt-get update
 - apt-get install -y comodit-agent
 - wget "${_urls["agent.conf"]}" -O /etc/comodit-agent/comodit-agent.conf
 - /usr/bin/comodit-agent --uri ${_setup_url}
 - systemctl start comodit-agent
5. Create a new host
You are now ready to provision your first host with ComodIT. Go to the ‘Hosts’ section and click the Add button. A wizard will guide you to prepare your host configuration.
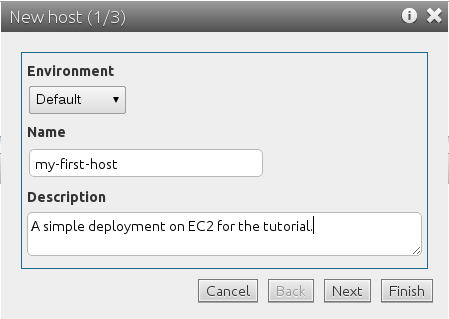
You can leave the environment as Default, pick a name and enter a short description. Environments help you group hosts within your organization (e.g. by type, geographies, teams, etc.). The name of the host has to be unique within a given environment. When you are done, click Next.
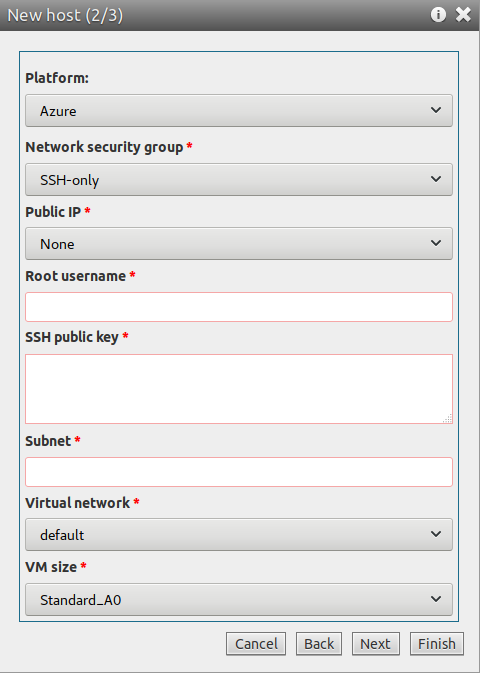
6. Pick a platform
The next step in the host creation process is to decide where you want to deploy the machine and its hardware characteristics. In this case, pick the Azure platform you have just created. Complete requested parameters and click Next.
7. Pick a distribution
You must now pick a distribution (i.e. an operating system) to install on this machine. Just select the one create previously (which has no parameters) and click Finish.
8. Deploy the host
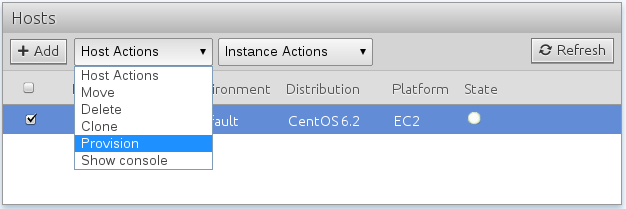
Your host is now ‘defined’ within ComodIT. This means that the description (platform, distribution, settings) has been stored in your organization. The next step for you is to trigger the deployment process. To do so, click on the host and pick the ‘Deploy’ action from the ‘Host Actions’ menu. Click Ok and ComodIT will start the deployment. If you double check within your Azure dashboard, you should see that additional resources are being created.
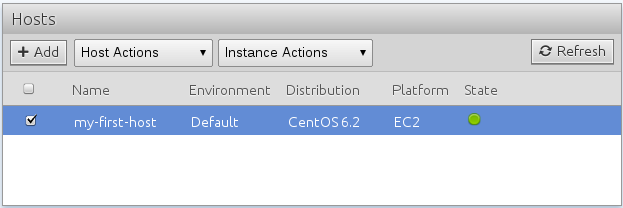
9. Host is ready for use
At the end of the install process, the machine reboots. When ready, a green light appears in the State column and the host becomes ‘ready’. This means that the machine has been successfully deployed, our ComodIT agent has been installed, and is now connected. If we loose the connection, the State turns into a orange light. If compliance issues are detected on the host, it turns into a red light.
2016 © ComodIT. All Rights Reserved. Privacy Policy | Terms of Service