Provisioning on a Docker platform
The following is a step-by-step tutorial to get you started with ComodIT and provision your first host on Docker using the ComodIt Docker plugin. If you get into troubles while following this guide, have a look at our support section for help.
1. Pre-requisites
a. You have a ComodIT account
We assume that you already have created an account on ComodIT and verified your email by clicking the link we sent to you. If you have issues subscribing to our service, please contact support.
b. You have installed Docker on a server
We also assume that you have a running Docker environment. If not, have a look at this guide on docker.io. Alternatively, you can use ComodIT to deploy an Ubuntu 12.04 server, together with the Docker application.
c. You have installed the ComodIT Agent on your Docker server
If you haven"t installed your Docker environment with ComodIT, then you need to install the ComodIT Agent manually in order to connect your host to the ComodIT platform. You can follow this guide.
2. Install the ComodIT Agent Docker plugin
On your Docker server, install the ComodIT Agent Docker plugin from our git repository.
git clone https://github.com/comodit/comodit-agent-plugin-docker.git
cd comodit-agent-plugin-docker
python setup.py install
Edit the file /etc/comodit-agent/plugins/docks.conf, un-comment the
local definition, and optionaly rename your platform.
[Amsterdam]
url=unix://var/run/docker.sock
Restart the ComodIT agent for changes to take effect.
service comodit-agent restart
3. Pull the ComodIT-ready Docker image
We"ve packaged a CentOS 6.4 Docker Image ready for use with ComodIT (it includes the bootstrapping logic that will connect your machine to ComodIT. Have a look at the Dockerfile on Github to see how we"ve built it. You can build your own images for other operating systems in a similar way.
To download our image on your system, execute the following command:
docker pull comodit/centos
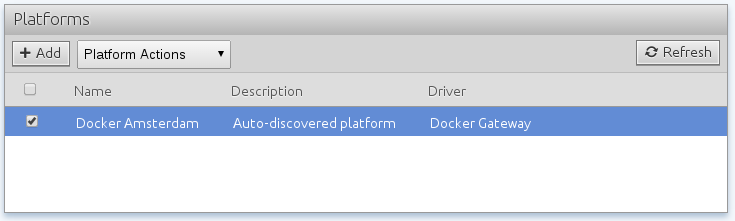
4. Your Docker platform is automatically added to ComodIT
Your new Docker platform is automatically discovered and configured
within ComodIT. Have a look at the Platforms list to verify that
it worked. In case of issues, have a look at the comodit agent logs for
error messages (/var/log/comodit-agent/messages.log). You may have to set the
loglevel to DEBUG in /etc/comodit-agent/comodit-agent.conf.
5. Create a new host
You can leave the environment as Default, pick a name and enter a short description. Environments help you group hosts within your organization (e.g. by type, geographies, teams, etc.). The name of the host has to be unique within a given environment. When you are done, click Next.

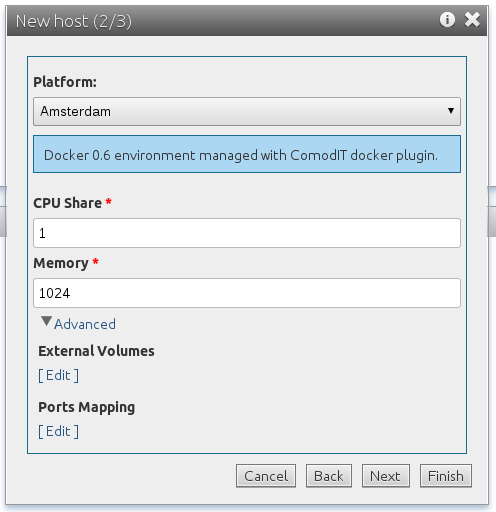
6. Pick a platform
The next step in the host creation process is to describe the server physical constraints such as memory and CPU. Pick the Docker platform that was previously discovered. You can also configure docker port mapping or external data storage, directly from the ComodIT user interface. When you are done, click Next.
7. Pick a distribution
You must now pick an operating system distribution to install on this machine. If you have pulled our ComodIT CentOS 6.4 Docker image in step #3, then you can get the corresponding distribution from the ComodIT Marketplace.
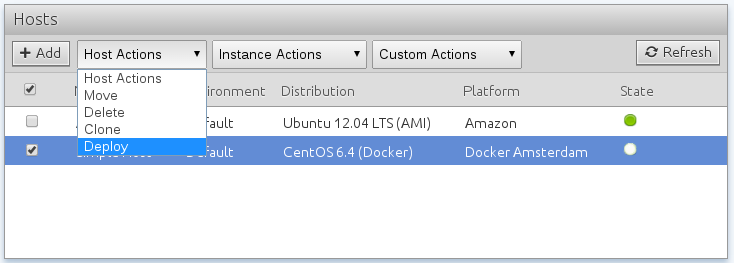
8. Deploy the host
Your host is now ‘defined’ within ComodIT. This means that the description (platform, distribution, settings) has been stored in your organization. The next step for you is to trigger the provisioning process. To do so, click on the host and pick the ‘Deploy’ action from the ‘Host Actions’ menu. Click ‘Ok’ and ComodIT will start the provisioning process. Your host will change from the ‘defined’ state to the ‘provisioning’ state.
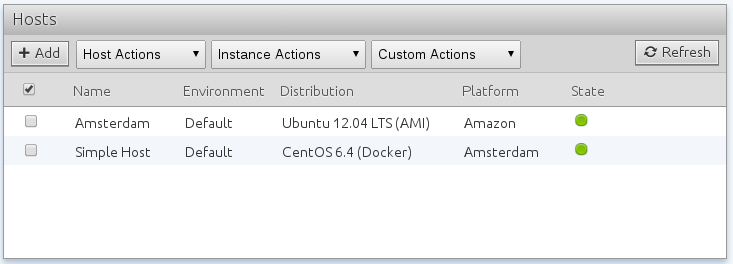
9. Host is ready for use
At the end of the install process, a green light appears and the host state becomes ‘ready’ (you may need to click on Refresh button in order to see this). This means that the machine has been successfully deployed, our ComodIT agent has been installed, and is now connected. If we loose the connection, the state turns into an orange light. If compliance issues are detected on the host, it turns into a red light.
2016 © ComodIT. All Rights Reserved. Privacy Policy | Terms of Service