Provisioning on OVH-OpenStack
The following is a step-by-step tutorial to get you started with ComodIT and provision your first host on OVH-OpenStack. If you get into troubles while following this guide, have a look at our support section for help.
1. Pre-requisites
a. You have a ComodIT account
We assume that you already have created an account on ComodIT and verified your email by clicking the link we sent to you. If you have issues subscribing to our service, please contact support.
b. You have a OVH account
We also assume that you have an OVH account and that you are the administrator of your OVH infrastructure.
2. Create OpenStack credential
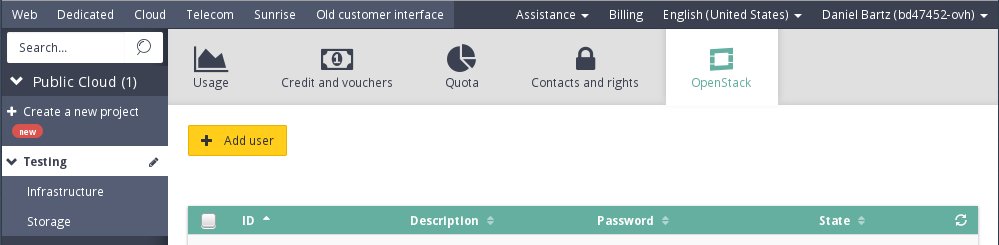
In the customer interface go to OVH -> Cloud , click on the “Project management” tab on top-right, then - in the new page - click on OpenStack tab on the top-right.
‘Add user’ for example ‘ComodIT’. Keep a copy of the ID and Password as you will need them later.
Click on ‘Launch OpenStack Horizon’ icon (right) and log in with the previously received credentials. (Username is the ID field)
3. Configure region
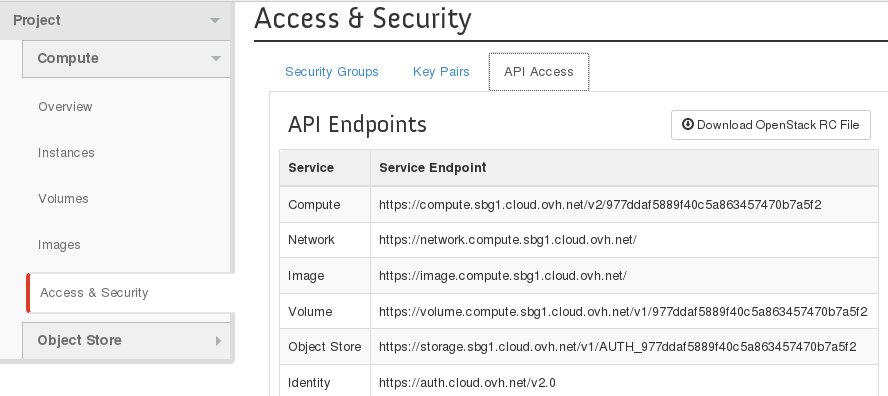
Chose a Region (like SBG1, GRA1, BHS1, …) from the dropdown list on the upper left, near the “OVH” logo. Click on ‘Access & Security’ then on the ‘API Access’ tab and download the OpenStack RC File clicking on the top-right button. Open the file and look for OS_TENANT_NAME variable, you will need it.
#!/bin/bash

# To use an Openstack cloud you need to authenticate against keystone, which
# returns a **Token** and **Service Catalog**. The catalog contains the
# endpoint for all services the user/tenant has access to - including nova,
# glance, keystone, swift.
#
# *NOTE*: Using the 2.0 *auth api* does not mean that compute api is 2.0. We
# will use the 1.1 *compute api*
export OS_AUTH_URL=https://auth.cloud.ovh.net/v2.0

# With the addition of Keystone we have standardized on the term **tenant**
# as the entity that owns the resources.
export OS_TENANT_ID=977ddaf5889f40c5a863457470b7a5f2
export OS_TENANT_NAME="0331350657060291"

# In addition to the owning entity (tenant), openstack stores the entity
# performing the action as the **user**.
export OS_USERNAME="AxZ3pPWmUEGy"

# With Keystone you pass the keystone password.
echo "Please enter your OpensStack password: "
read -sr OS_PASSWORD_INPUT
export OS_PASSWORD=$os_PASSWORD_INPUT

# If your configuration has multiple regions, we set that information here.
# OS_REGION_NAME is optional and only valid in certain environments.
export OS_REGION_NAME="SBG1"
# Don't leave a blank variable, unset it if it was empty
if [ -z "$OS_REGION_NAME" ]; then unset OS_REGION_NAME; fi
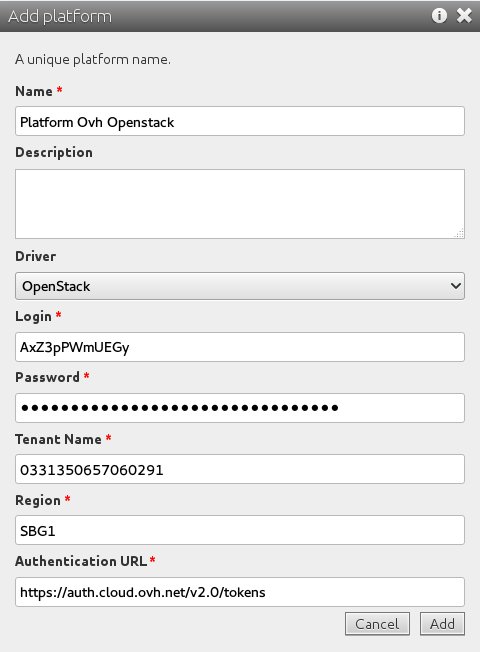
4. Add OpenStack platform
In ComodIT add a new ‘Platform’ choosing the ‘OpenStack’ driver and fill the fields with the collected data. You may for example choose a name like “OVH - OpenStack - SBG1” if your Region is SBG1. The Authentication URL should be https://auth.cloud.ovh.net/v2.0/tokens (note the presence of “tokens” in the URL). If the provided information are correct ComodIT will let you add the ‘Platform’. (see dropdown list for list of regions names)
5. Add a distribution
Now you need to add a OVH OpenStack compatible ‘Distribution’. To do so, download for example the “CentOS 7.1 (AMI)” Distribution from the store. You may want to rename it “CentOS 7.1(image)” as we will make it working on both AWS and OVH OpenStack.
6. Configure distribution
Select this Distribution and add it a setting named “openstack.imageName” with the value “Centos 7”. Be careful with the value, it is case sensitive and space are important.
Still on this Distribution add a file named ‘userdata’ (case sensitive) with the following content (very similar but with some change to the ec2.userData file) :
#!/bin/sh

# Add EPEL to the available repositories
yum install epel-release --assumeyes

# Configure comodit.repo
yum install http://dl.comodit.com/pub/centos/7/x86_64/comodit-release-7-0.el7.noarch.rpm --assumeyes

<#if update_on_install>
# Update the system (enabled repositories)
yum update --assumeyes

</#if>
# Install comodit-agent
yum --enablerepo=epel install comodit-agent --assumeyes

# Configure Synapse
cat << EOF > /etc/comodit-agent/comodit-agent.conf
[bootstrap]
register = True
host = ${_config.comodit_host}
username = ${_org.access_key}
password =  ${_org.secret_key}
uuid = ${_host.uuid}
EOF

# Disable SELinux (you should adapt this, we use permissive for demo, ...)
/usr/sbin/setenforce 0

# Run ComodIT agent for one time install
/usr/bin/comodit-agent --uri ${_setup_url}

# Enable service
/sbin/chkconfig comodit-agent on

# Start service
/sbin/service comodit-agent start
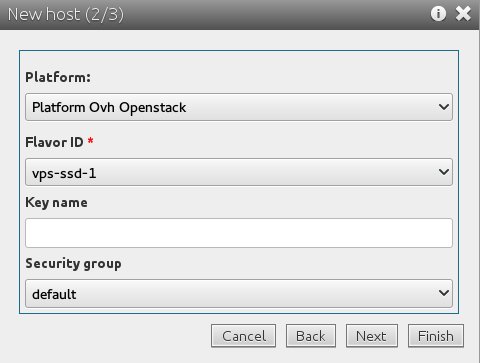
8. Create new host
Now create a new host with the newly created Platform choosing the vps-ssd-1 “Flavor ID” and the “default” security group. Then add the new Distribution and you are now ready to launch VMs on OVH OpenStack.
2016 © ComodIT. All Rights Reserved. Privacy Policy | Terms of Service