Provisioning on Amazon EC2
The following is a step-by-step tutorial to get you started with ComodIT and provision your first host on EC2. If you get into troubles while following this guide, have a look at our support section for help.
1. Pre-requisites
a. You have a ComodIT account
We assume that you already have created an account on ComodIT and verified your email by clicking the link we sent you. If you have issues subscribing to our service, please contact support.
In the following, we assume that you already have created an account on ComodIT.
b. You have an Amazon EC2 account
We also assume that you have an Amazon EC2 account, properly setup, and are able to provision machines within EC2 itself.
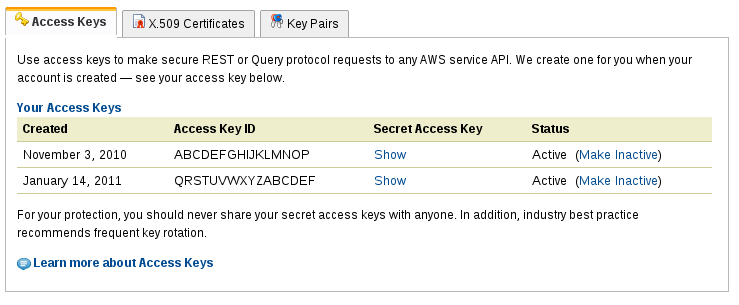
c. You have an access key and secret key for your EC2 account
In order to allow a third party service like ComodIT to act on your behalf on EC2, you have to generate an Access Key ID and an associated Secret Access Key. To do this, follow this link. You will see a dashboard similar to the one below, it enables you to create/manage your keys. If none are present, click on ‘Create a new Access Key’ to generate a new pair. Write down the Access Key ID and corresponding Secret Access Key for later use.
2. Log-in ComodIT for the first time
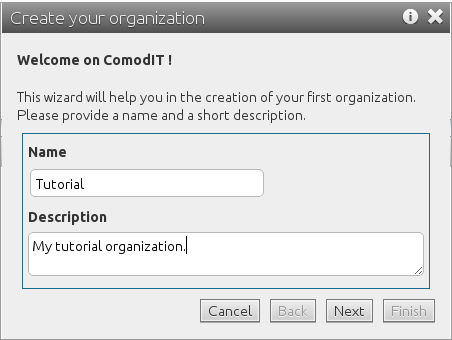
When you log-in for the first time in ComodIT, a dialog pops up and invites you to create your first organization. It will keep on re-appearing as long as you don’t have at least one organization in your account (either you have created it, or someone adds you to an existing organization).
3. Create your first organization
If you don’t yet have one, you first have to create a new organization. This organization will act as a container for your hosts and applications recipes. The organization can be shared between multiple users. Pick a name (has to be unique within the whole of ComodIT) and enter a short description (this is not required). When your new organization is created, it will also be populated with a sample distribution and application so that you can quickly start provisioning your first host.
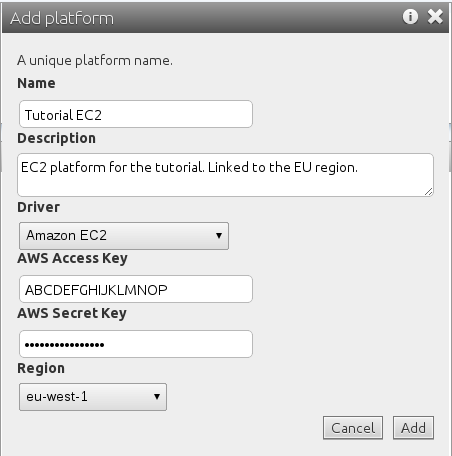
4. Create your Amazon EC2 platform
Now that you have an organization, you can add an Amazon EC2 platform to this organization. A platform describes a target (physical, virtual or cloud) where hosts can be deployed by ComodIT. To add a new one to your organization, go within the ‘Platforms’ section and click the Add button.
Pick a name and enter a description for this new platform. Then select the ‘Amazon EC2’ driver in the drop down list and add your AWS Access Key ID and Secret Access Key (see above on how to obtain them). You also have to pick an AWS region. If you want to work with multiple regions, you will have to create additional platform later. When done, click Add.
5. Create a new host
You are now ready to provision your first host with ComodIT. Go to the ‘Hosts’ section and click the Add button. A wizard will guide you to prepare your host configuration.
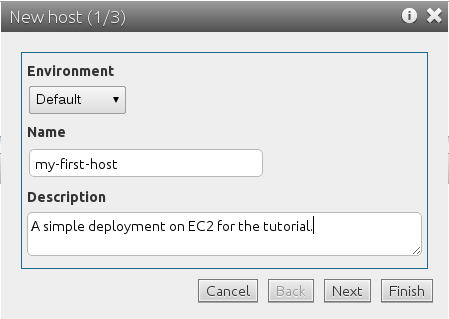
You can leave the environment as Default, pick a name and enter a short description. Environments help you group hosts within your organization (e.g. by type, geographies, teams, etc.). The name of the host has to be unique within a given environment. When you are done, click Next.
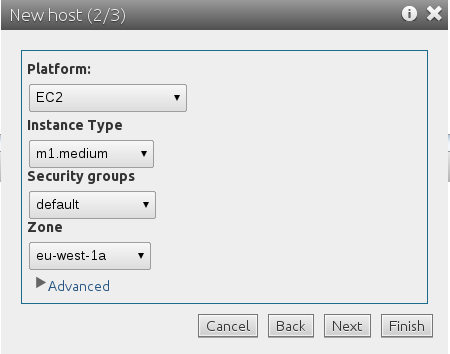
6. Pick a platform
The next step in the host creation process is to decide where you want to deploy the machine and its hardware characteristics. In this case, pick the EC2 platform you have just created. You can leave the rest as default and click Next.
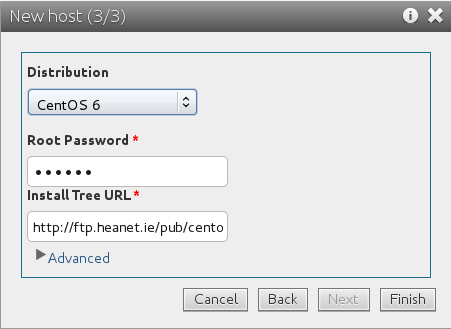
7. Pick a distribution
You must now pick an operating system distribution to install on this machine. We provide you with a sample CentOS 6 deployment, you can select it from the drop down menu. Set the root password and install tree URL (you should set this value in function of your EC2 region, see this mirrors list; default value is OK for eu-west-1). When done, click Finish.
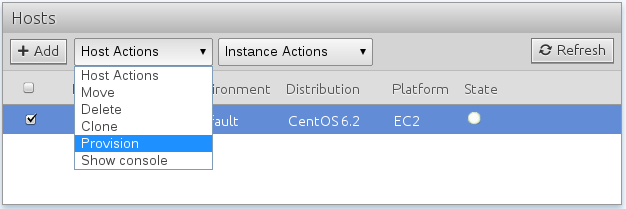
8. Deploy the host
Your host is now ‘defined’ within ComodIT. This means that the description (platform, distribution, settings) has been stored in your organization. The next step for you is to trigger the deployment process. To do so, click on the host and pick the ‘Deploy’ action from the ‘Host Actions’ menu. Click Ok and ComodIT will start the deployment. Your host will change from the ‘defined’ State (white bullet) to the ‘provisioning’ State (clock icon). If you double check within your AWS dashboard, you should see a new instance has been created.
9. Monitor progress through VNC
As part of our Centos 6 recipe, we have enabled VNC during installation. This enables you to visualize the progress of the installation through a VNC connection to your host. This can be done using ComodIT as long as the security group assigned to the host allows ComodIT to access its VNC port. To open the VNC console, simply pick the ‘Show console’ action from the ‘Instance actions’. Barring any firewall issues, you should see the install progressing.
As you can see in this example, we are really installing a new operating system on an EC2 instance, instead of reusing an ‘AMI’ or ‘gold image’. This is one of the key features of ComodIT, enabling you to quickly build new images. You can of course also directlty use an AMI to quickstart the process.
VNC is not available after the installation process. If you need to access VNC one the machine reboots, you need to install the VNC application.

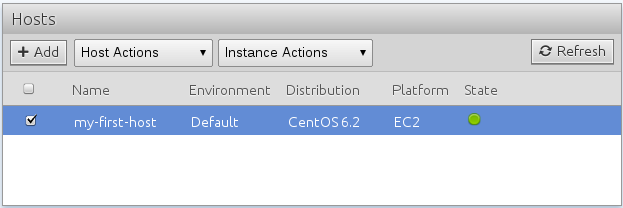
10. Host is ready for use
At the end of the install process, the machine reboots. When ready, a green light appears in the State column and the host becomes ‘ready’. This means that the machine has been successfully deployed, our ComodIT agent has been installed, and is now connected. If we loose the connection, the State turns into a orange light. If compliance issues are detected on the host, it turns into a red light.
2016 © ComodIT. All Rights Reserved. Privacy Policy | Terms of Service